RV Power Center: Performance

This is the tenth and last post describing our RV power system. Our previous post described the final design and some of its characteristics. This post summarizes the system’s performance on our first overnight outing. First, for convenience, we briefly describe the final system. Next, we describe our outing and associated conditions and finally explain the system’s performance.

Final System

Our power system fits within the left pass-through storage area, illustrated in Figure 1.

Figure 1 illustrates our complete power center providing 800 W of solar, 360 Ah of Lithium-ion batteries, and a 3kVA invert/charger.

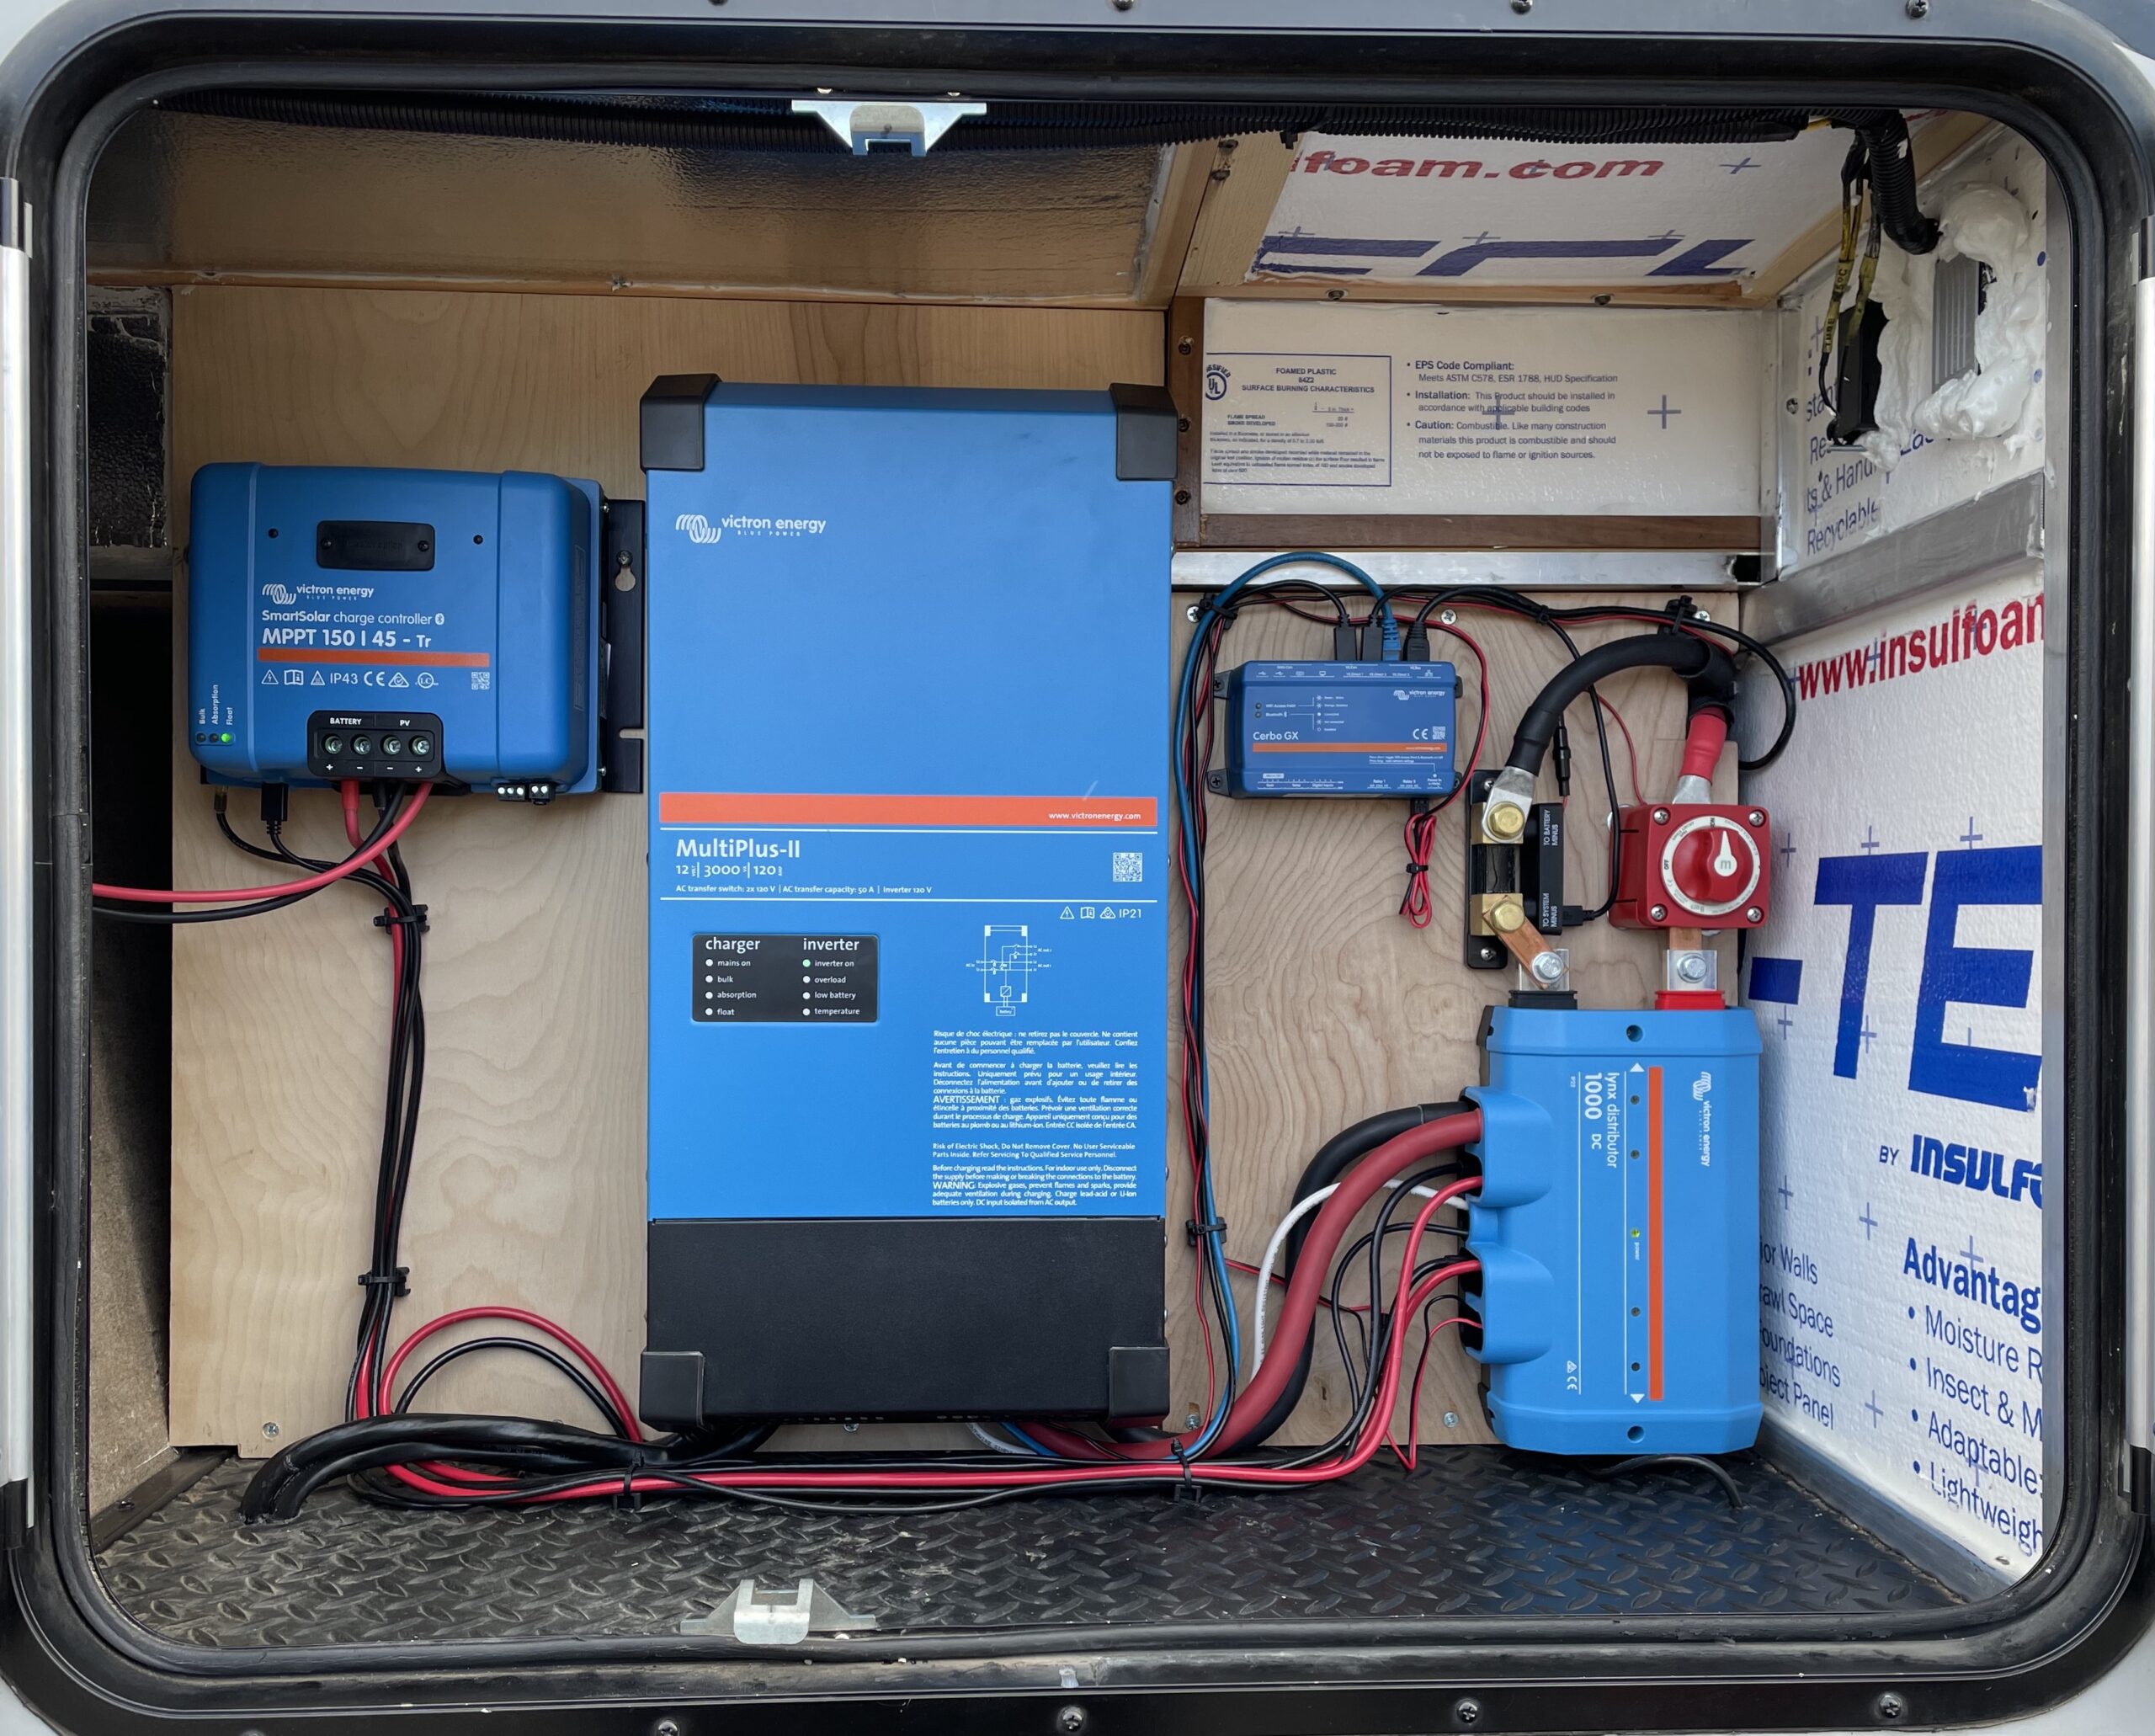
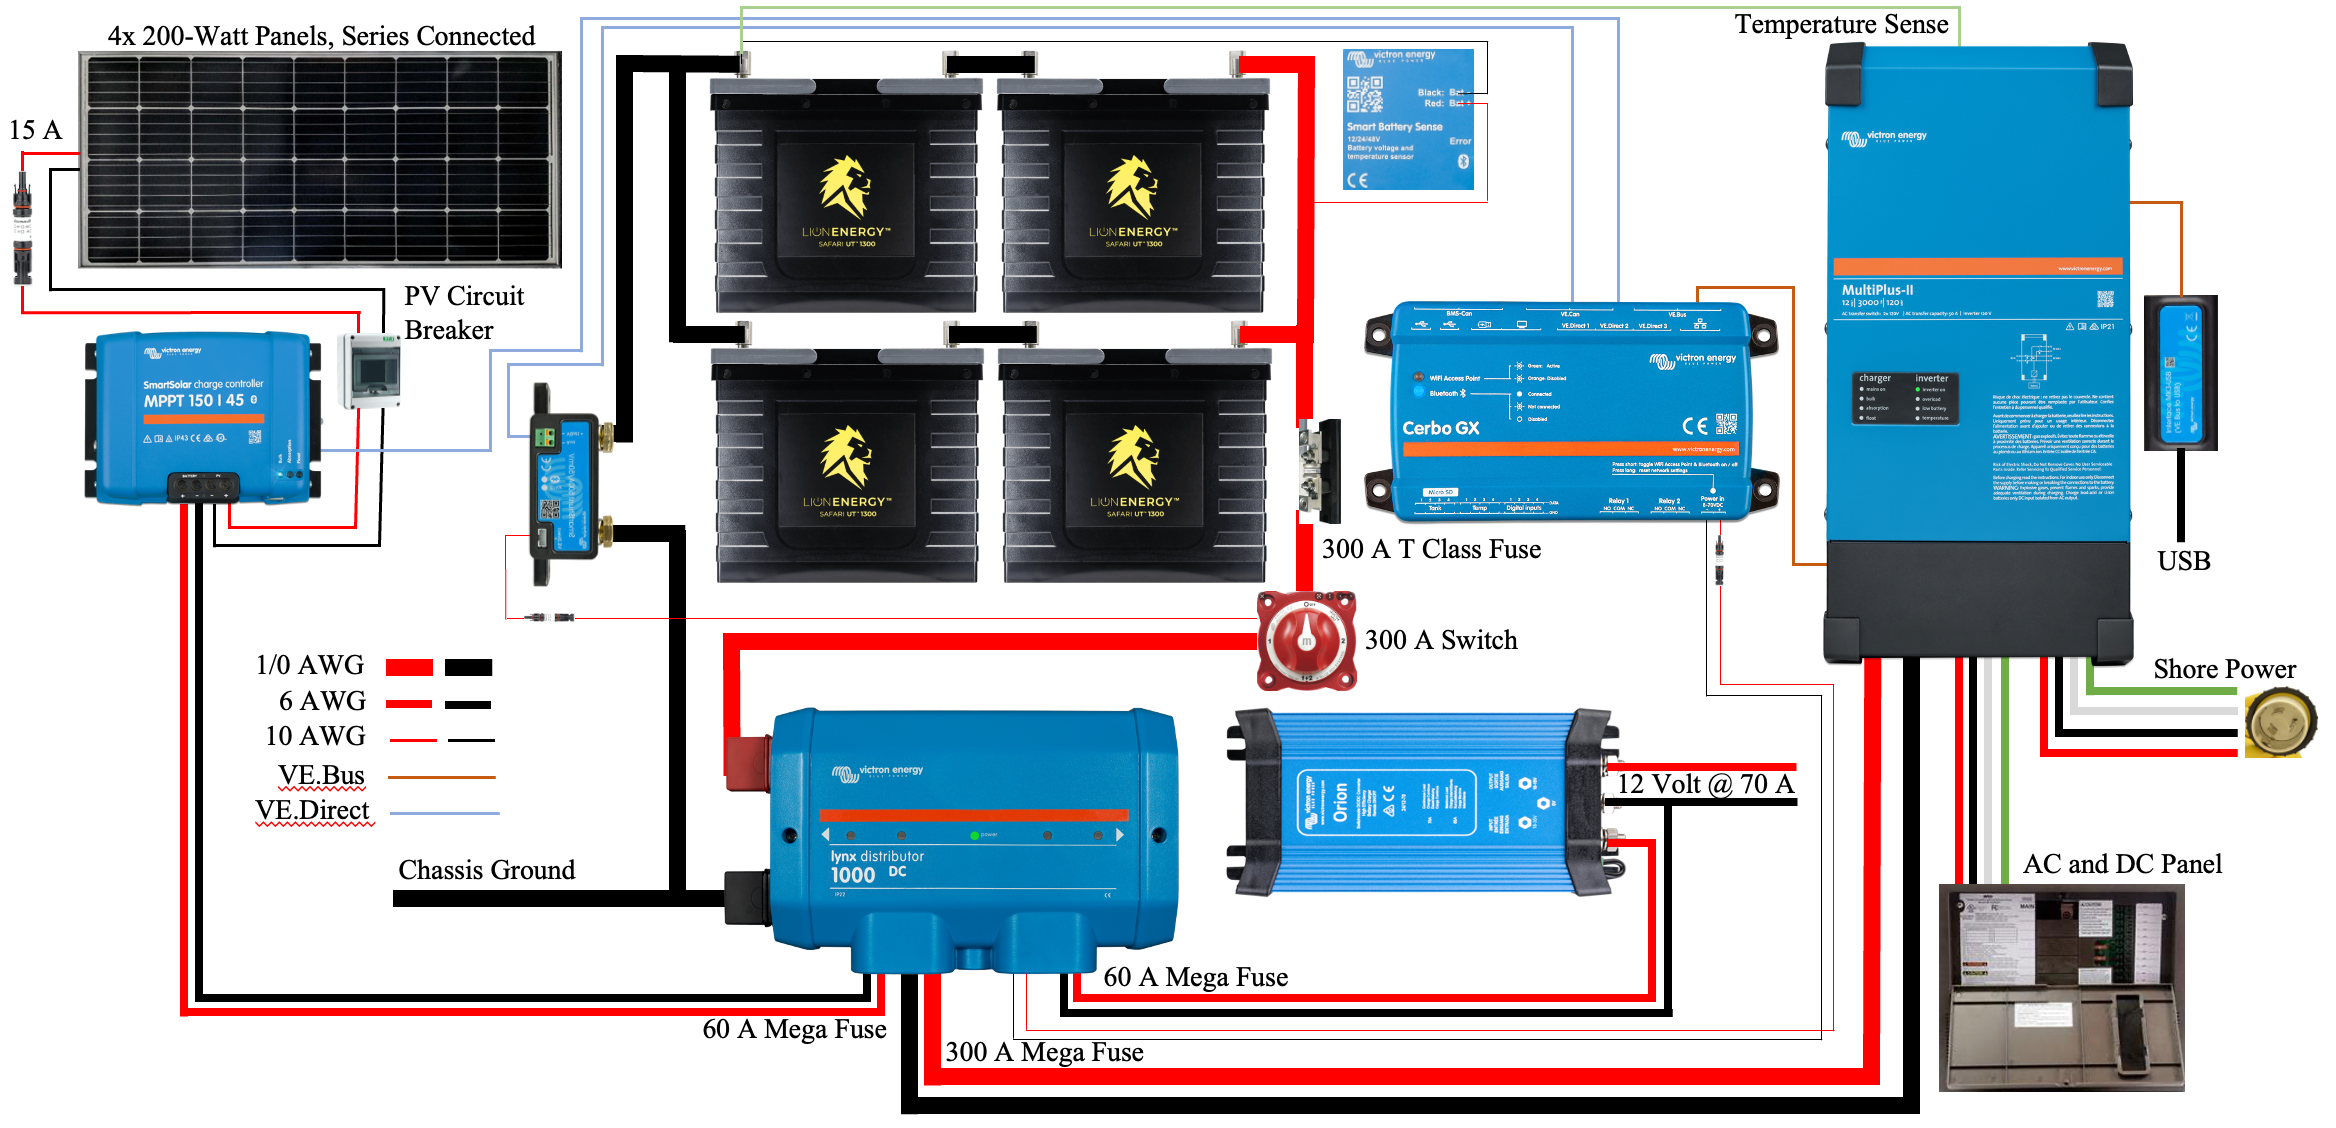
Figure 1 illustrates the major components of our system. There are seven major components illustrated from upper left to lower right:

  • Solar PV disconnect switch
  • Victron SmartSolar 150/45 solar charger
  • Victron MultiPlus-II 2x 120V inverter/charger
  • Victron Cerbo GX monitoring system
  • Victron SmartShunt
  • Blue Sea battery switch
  • Victron Lynx Distributor

Our 360 Ah battery bank is behind and to the right of this location. The solar charger and the SmartShunt attach to the Cerbo GX via VE.Direct cables. The battery voltage monitor (mounted on the battery bank) and the MultiPlus-II connect to the Cerbo GX via two VE.Bus cables.

Our Outing – Red Canyon, Utah

We spent two nights in Red Canyon Campground in southern Utah in late April. This outing is described in more detail in another post. The daytime temperatures were in the mid-60s, and the lows were in the low-20s. The sun was bright the first day. We had a couple of hours of good sunlight on the second day and then overcast with rain.

Performance

With the nighttime temperatures in the 20s, our furnace periodically ran to keep the trailer at approximately 65 degrees. In addition, we watched television for several hours at night, used lights, and charged a couple of phones, watches, and an iPad. With all of these devices running and charging, we consumed nearly 80 Ah of our 360 Ah battery bank. Our batteries were replenished after just a few hours of good sunlight.

Early in the day, the solar charging system produced about 360 W. I decided to check the cleanliness of the solar panels and was shocked to find them coated in mud. It was thick enough that I could not remove it without a significant amount of water. After cleaning the panels, the system produced just over 500 W. A little water and elbow grease pay off.

Figure 2, our electric fireplace.

After a 5 mile hike, we returned to find our RV an uncomfortable 81 degrees. We flipped on the AC and set the thermostat to 75. The AC drew a constant 1100 W and ran for approximately 30 minutes. Later that evening, the temperature in the RV dipped down to about 68 while we were still up and around, so we turned on the electric fireplace. That unit drew nearly 1400 W but warmed us right up. We tried a few other electric devices to see the practicality. The refrigerator on electric power drew about 22 A, my wife’s curling iron was no big deal at 200 W, and I’ve tried the microwave before at just over 1000 W.

It is a pleasure to use all of our systems without generating noise. We can use the AC, microwave, and TV after campground quiet hours without worrying about bothering others. However, it is funny watching us adapt to this new world. Are we content toasting our bread in the broiler? Of course not; we need a toaster because we can have one! I am sure we’ll add a hairdryer and who knows what else. Nevertheless, I am pleased with the outcome and the comfort it has added to our lives.

RV Electrical Upgrade

We spent more than 30 years tent camping and backpacking with our children, but recently we’ve transitioned to a bumper pull RV. We continue to love camping in the great outdoors but like to do so with all of the luxuries of life, glamping. We love the solitude and the noises of nature and tolerate crowded campgrounds and the noise of generators that start each morning and run through the day. Instead, we want to take a different path. We want the best of both worlds, and this series of posts will document our path that leads there.

The Big Picture

We want the ability to use our microwave, television, and other 120 V AC systems without having to ruin our camping solitude with a generator. In addition, we want to minimize the intrusion of our generator while recharging our batteries.

On a typical day of camping in our RV, we consume 1400 Watt-hours or approximately 115 Ah of our 12 V system. About 30 Ah are consumed watching television for a few hours and 85 Ah for lights, fans, heater blower, etc. We want to watch TV for several hours per day and use a game console for several additional hours. In addition, we want to use our microwave for making snacks along the way.

Using our TV for six hours consumes 60 Ah, three hours of our game console consumes 30 Ah, and our microwave for 10 minutes consumes 13 Ah, totaling 103 Ah. This usage, combined with the 85 Ah mentioned above, brings the total to nearly 200 Ah. To ensure some reserve power, we’re planning on a 400 Ah battery bank. To recharge our batteries each day, without having to hear that noisy generator, we’re planning on 800 Watts of solar.

To accommodate our AC devices, including the TV, game console, and microwave, we need an inverter/charger capable of producing 1320 Watts or more. We’d also like to use our air conditioner for short periods to keep our dog comfortable while we shop, eat in a restaurant, take a short hike, etc. Our air conditioner consumes approximately 1500 Watts. We also desire the charger to charge our battery bank as quickly as possible for those terrible days when we have to run our generator. Our RV is wired for a 50 A service, and this should be passed through to the circuit panel when connected to shore power.

In summary, we want to enjoy the quiet solitude of camping and some of the luxuries of life. We want to do this with as few detrimental modifications to our trailer as possible. Several items will make this goal a reality:

  • 400 Ah of lithium-ion batteries
  • 800 Watts of solar power
  • An inverter that is capable of producing nearly 3000 Watts of 120 V AC power
  • A battery charger that is capable of consuming our entire generator output to minimize charge time

Our Plan

We intend to accomplish our previously outlined goals incrementally so that between projects, our trailer is still functional. Therefore, our first step was to develop our design so we could start breaking it into sub-projects. Figure 1 is the schematic of the plan we intend to implement.

We made an early design choice to create a 24 V system with four 12 V lithium-ion batteries. We chose this because the components we intend to use work at 12 or 24 V, and at 24 V, the system currents will be cut in half, reducing wire size and decreasing unwanted heat dissipation.

Figure 1, Schematic diagram of 24 Volt electrical system with 12 Volts available for backward compatibility with existing RV systems.

We intend to locate most of the equipment illustrated in Figure 1 in the left-hand side of our pass-through storage area near the front of our trailer. We’re going to call this location our power center. The solar panels will go on the RV roof, and the batteries are going under our bed which is just to the rear of the pass-through storage area.

Currently, our trailer is configured in a fairly standard way. We have two Lion Energy UT 1200 lithium-ion batteries mounted on the front a-frame of our trailer and housed in conventional plastic battery boxes. We have some solar on the roof with the solar charge controller mounted in a bedroom closet, and the rest of the electrical components and wiring are factory default. Our upgrade project will require a lot of time and work, and as previously mentioned, we intend to do it incrementally and leave our trailer in shape for traveling between sub-projects. Our tasks include:

  • Constructing the new power center with sufficient space and strength to mount all of the components in our design.
  • Adding solar panels, routing PV cables to our new power center, mounting our charge controller and disconnect switch, and connecting to our original battery bank.
  • Making room for our four batteries under our bed.
  • Connecting the batteries in a parallel/series configuration to obtain our desired 24 Volt system and interfacing this new battery bank to the existing RV systems.
  • Routing AC lines from the power center to the existing RC circuit panel and back.
  • Mounting the remaining components in the power center and wiring them into the system.
  • Configuring each prgrammable component.
  • Thoroughly testing the system, cleaning up flaws, and enjoying the outcome

This post is the first in a series to document our journey from where we are to where we want to be. Each sub-project above will be thoroughly described in separate posts, and we’ll include the good, the bad, and the ugly. We hope you enjoy our journey.

css.php